 Corner Captivation: Building DIY Corner Shelves is a comprehensive guide to creating beautiful and functional corner shelves for your home. Whether you are a beginner or an experienced DIYer, this guide will provide you with the tools and techniques you need to create stunning corner shelves that will add style and storage to any room. With step-by-step instructions and detailed illustrations, you will learn how to measure, cut, assemble, and finish your corner shelves. You will also learn how to choose the right materials and hardware for your project, as well as tips and tricks for making the most of your corner shelves. With Corner Captivation, you can create the perfect corner shelves for your home.
How to Create Custom Corner Shelves for Your Home: A Step-by-Step Guide
Creating custom corner shelves for your home can be a great way to add storage and style to any room. With a few simple tools and materials, you can create a unique and attractive corner shelf that will fit perfectly into your home. This step-by-step guide will walk you through the process of creating a custom corner shelf.
Step 1: Gather Materials and Tools
Before you begin, you will need to gather the necessary materials and tools. You will need wood for the shelf, screws, a drill, a saw, sandpaper, and wood glue. You may also want to purchase a corner shelf bracket to help support the shelf.
Step 2: Measure and Cut the Wood
Once you have all of your materials and tools, you will need to measure and cut the wood for the shelf. Measure the corner where you want to install the shelf and then cut the wood to the appropriate size. Make sure to use a saw that is appropriate for the type of wood you are using.
Step 3: Sand and Glue the Wood
Once the wood is cut to size, you will need to sand it down to create a smooth surface. Use sandpaper to remove any rough edges and then use wood glue to attach the pieces of wood together. Allow the glue to dry completely before moving on to the next step.
Step 4: Attach the Shelf Bracket
If you purchased a corner shelf bracket, you will need to attach it to the shelf. Use a drill to attach the bracket to the shelf, making sure to use screws that are appropriate for the type of wood you are using.
Step 5: Install the Shelf
Once the shelf is assembled, you can install it in the corner. Use a level to make sure the shelf is level and then use screws to attach it to the wall. Make sure to use screws that are appropriate for the type of wall you are attaching the shelf to.
Creating custom corner shelves for your home can be a great way to add storage and style to any room. With a few simple tools and materials, you can create a unique and attractive corner shelf that will fit perfectly into your home. By following this step-by-step guide, you can easily create a custom corner shelf that will look great in your home.
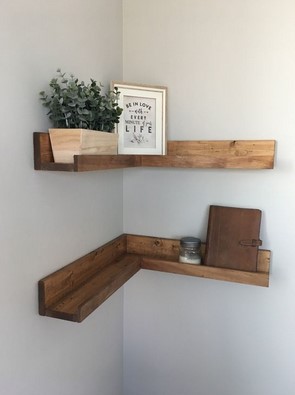
Maximize Your Space with DIY Corner Shelves: Tips and Tricks for Making the Most of Your Corners
Maximizing space in any room can be a challenge, but with the right tools and techniques, it is possible to make the most of even the most awkward corners. DIY corner shelves are an ideal solution for making the most of these often-overlooked areas. By utilizing the vertical space in corners, these shelves can provide additional storage and display options without taking up valuable floor space. This article will provide tips and tricks for making the most of your corners with DIY corner shelves.
The first step in creating DIY corner shelves is to determine the size and shape of the shelves. Corner shelves can be made in a variety of shapes and sizes, depending on the space available and the desired look. When measuring for the shelves, it is important to consider the height of the ceiling and the depth of the corner. This will help to ensure that the shelves are the correct size and shape for the space.
Once the size and shape of the shelves have been determined, the next step is to choose the materials. Wood is a popular choice for DIY corner shelves, as it is relatively easy to work with and can be stained or painted to match the existing décor. Other materials, such as metal or plastic, can also be used, depending on the desired look.
When constructing the shelves, it is important to use the correct tools and techniques. For wood shelves, a drill, saw, and screws are necessary. For metal or plastic shelves, a drill and screws are sufficient. It is also important to use the correct screws for the material being used, as this will ensure that the shelves are securely attached to the wall.
Once the shelves are constructed, they can be decorated to match the existing décor. Paint, wallpaper, or fabric can be used to add color and texture to the shelves. Additionally, baskets, boxes, and other decorative items can be added to the shelves to create a unique look.
DIY corner shelves are an ideal solution for making the most of awkward corners. By utilizing the vertical space in corners, these shelves can provide additional storage and display options without taking up valuable floor space. With the right tools and techniques, it is possible to create attractive and functional corner shelves that will maximize the space in any room.Corner Captivation: Building DIY Corner Shelves is an excellent resource for anyone looking to add a unique and stylish touch to their home. With easy-to-follow instructions and helpful tips, this guide provides all the information needed to create beautiful and functional corner shelves. Whether you are a beginner or an experienced DIYer, this guide will help you create the perfect corner shelves for your home. With the help of Corner Captivation, you can easily create a beautiful and functional corner shelf that will add a unique and stylish touch to any room.