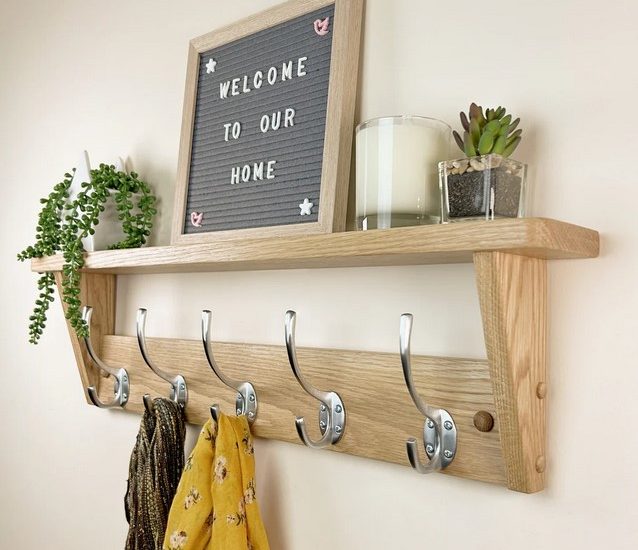
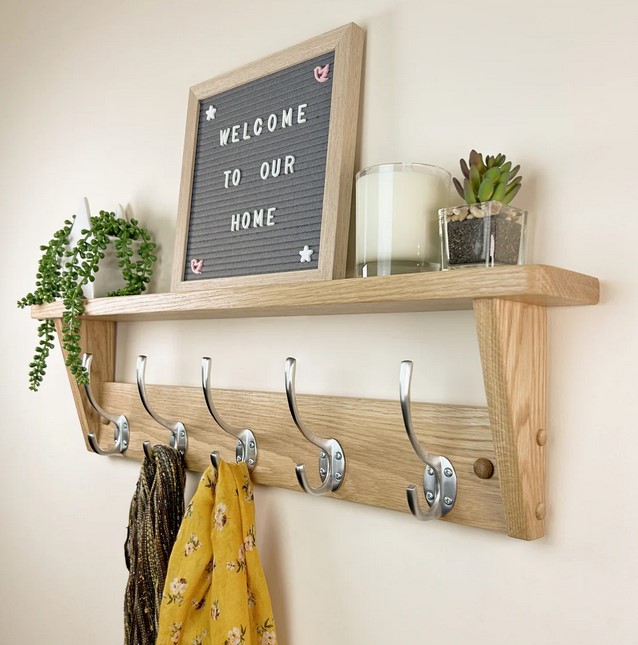
Creating your own DIY wooden coat racks is a rewarding and practical way to add both style and functionality to your entryway, hallway, or mudroom. Whether you’re looking for a simple rustic design or a more modern, sleek structure, a wooden coat rack can serve as an elegant solution for organizing your coats, scarves, hats, and bags. In this article, we’ll explore why wooden coat racks are an excellent choice for home storage, guide you through the process of making your own, and provide design tips to ensure that your new creation enhances the aesthetic of your space. Let’s dive into how you can create a functional and stylish wooden coat rack from scratch!
Why Choose Wooden Coat Racks?
Wooden coat racks are not just about keeping your outerwear organized—they are also versatile design elements that can elevate the overall look of your space. Here’s why you should consider building a DIY wooden coat rack:
Durability and Strength
Wood is a durable material, and when properly constructed, a wooden coat rack can hold even heavy winter coats or accessories. Depending on the type of wood you choose, your coat rack can last for years without showing significant wear. Hardwoods like oak, walnut, or maple are strong, but even softwoods such as pine or cedar can create sturdy and reliable coat racks for everyday use.
Customizable Designs
One of the biggest advantages of building your own wooden coat rack is the ability to personalize it. You can choose the dimensions, style, finish, and even the number of hooks. Whether you want a minimalist design with a few simple hooks or a large, multi-level rack, wood allows for a wide range of customization options. Plus, you can stain or paint the wood to match your existing décor or create a standout piece that serves as a focal point in your room.
Eco-Friendly and Sustainable
Wood is a renewable resource, making it an environmentally friendly option for furniture and home storage solutions. When you opt for a DIY wooden coat rack, you have the opportunity to choose sustainable materials or repurpose reclaimed wood from old furniture or pallets. By making your own coat rack, you can reduce waste and contribute to a greener planet.
Affordable Project
Building a coat rack from wood is an affordable DIY project, especially when compared to purchasing high-end coat racks from stores. Depending on your choice of wood and hardware, you can keep costs low while still creating a high-quality and functional piece. This is an excellent option for homeowners on a budget who want to make a stylish, custom storage solution without breaking the bank.
How to Build Your Own DIY Wooden Coat Rack
Now that we’ve explored the reasons why wooden coat racks are a great choice, let’s move on to how you can create one yourself. Whether you’re an experienced DIYer or a beginner, this project is relatively simple and doesn’t require advanced woodworking skills.
Materials You’ll Need:
- Wood boards (Choose your preferred type of wood, such as pine, oak, or cedar)
- Wall hooks or coat pegs
- Wood screws (for attaching the hooks to the wood)
- Drill (with a drill bit suitable for the screws and hooks)
- Measuring tape and pencil (for precise measurements)
- Sandpaper (for smoothing rough edges)
- Wood stain or paint (optional, for finishing)
- Wood glue (optional, for additional security)
Step-by-Step Instructions:
1. Plan Your Design
Start by determining the size of your coat rack and how many hooks you want. A basic design might consist of a single horizontal piece of wood with 4-6 hooks spaced evenly across it. For a larger rack, consider adding additional shelves or a vertical design for more storage options.
2. Measure and Cut the Wood
Measure the length of the wood based on your design. Typically, a coat rack should be between 24 to 48 inches wide. Once measured, use a saw to cut the wood to your desired length. If you’re using multiple pieces for a larger rack, ensure that they are cut to fit together seamlessly.
3. Smooth the Edges
Sand down the edges of your cut wood to remove any splinters or rough spots. This will ensure that the surface is smooth to the touch and safe to handle. If you want a more polished look, you can sand the entire surface to create a uniform finish.
4. Attach the Hooks
Mark the locations where you want to attach the hooks. Make sure the spacing between them is equal and aesthetically pleasing. Drill small pilot holes where you plan to insert the screws for the hooks. Next, attach the hooks using wood screws, ensuring that they are firmly secured to the wood.
5. Finish the Wood (Optional)
If you wish to add a stain or paint, this is the time to do so. Apply the stain or paint evenly across the wood, following the grain for a smooth, polished finish. If you prefer a natural look, you can simply apply a clear wood finish to protect the wood from moisture and wear.
6. Mount the Coat Rack
To hang your wooden coat rack on the wall, measure and mark where you want to place it. You can use wall anchors or screws to secure the rack to the wall, depending on the weight of the coat rack and the type of wall you have. Be sure to drill into the studs for a secure hold.
Design Tips for a Stylish DIY Wooden Coat Rack
While functionality is key when building a DIY wooden coat rack, the design of your piece can also greatly influence the overall vibe of your space. Here are a few design ideas to consider:
1. Minimalist and Modern
For a clean, modern look, consider creating a simple rectangular rack with sleek metal hooks. You can stain the wood in a light or medium finish, or paint it in a neutral color like white or gray to match contemporary interiors.
2. Rustic Charm
If you prefer a more rustic style, use reclaimed wood for a weathered, textured appearance. Add wooden pegs instead of metal hooks and leave the natural grain of the wood visible. You can also incorporate decorative elements like rope or leather straps for a vintage touch.
3. Industrial Style
Pair wood with metal brackets or pipes to achieve an industrial look. Use dark-stained wood for the base and combine it with matte black or steel hooks to create a bold contrast. This design works well in modern lofts or urban-style apartments.
4. Multi-Level Storage
For larger families or homes with more outerwear, create a multi-level coat rack. Install several horizontal boards, one above the other, each with its own set of hooks. This will maximize storage and add an interesting layered effect to the design.
Building your own DIY wooden coat racks offers a fantastic opportunity to combine creativity with practicality. Not only do they serve as an effective way to keep your entryway tidy, but they also provide a chance to craft a unique and personal storage solution for your home. Whether you prefer a rustic, modern, or industrial design, there’s a coat rack style to suit every taste and space. By following the steps outlined above, you can create a high-quality piece of furniture that reflects your personal style and meets your organizational needs. Happy building!